


Resources
flower
Step-by-Step Guide to Filling Pre-Rolled Cones by Hand
Table of Contents
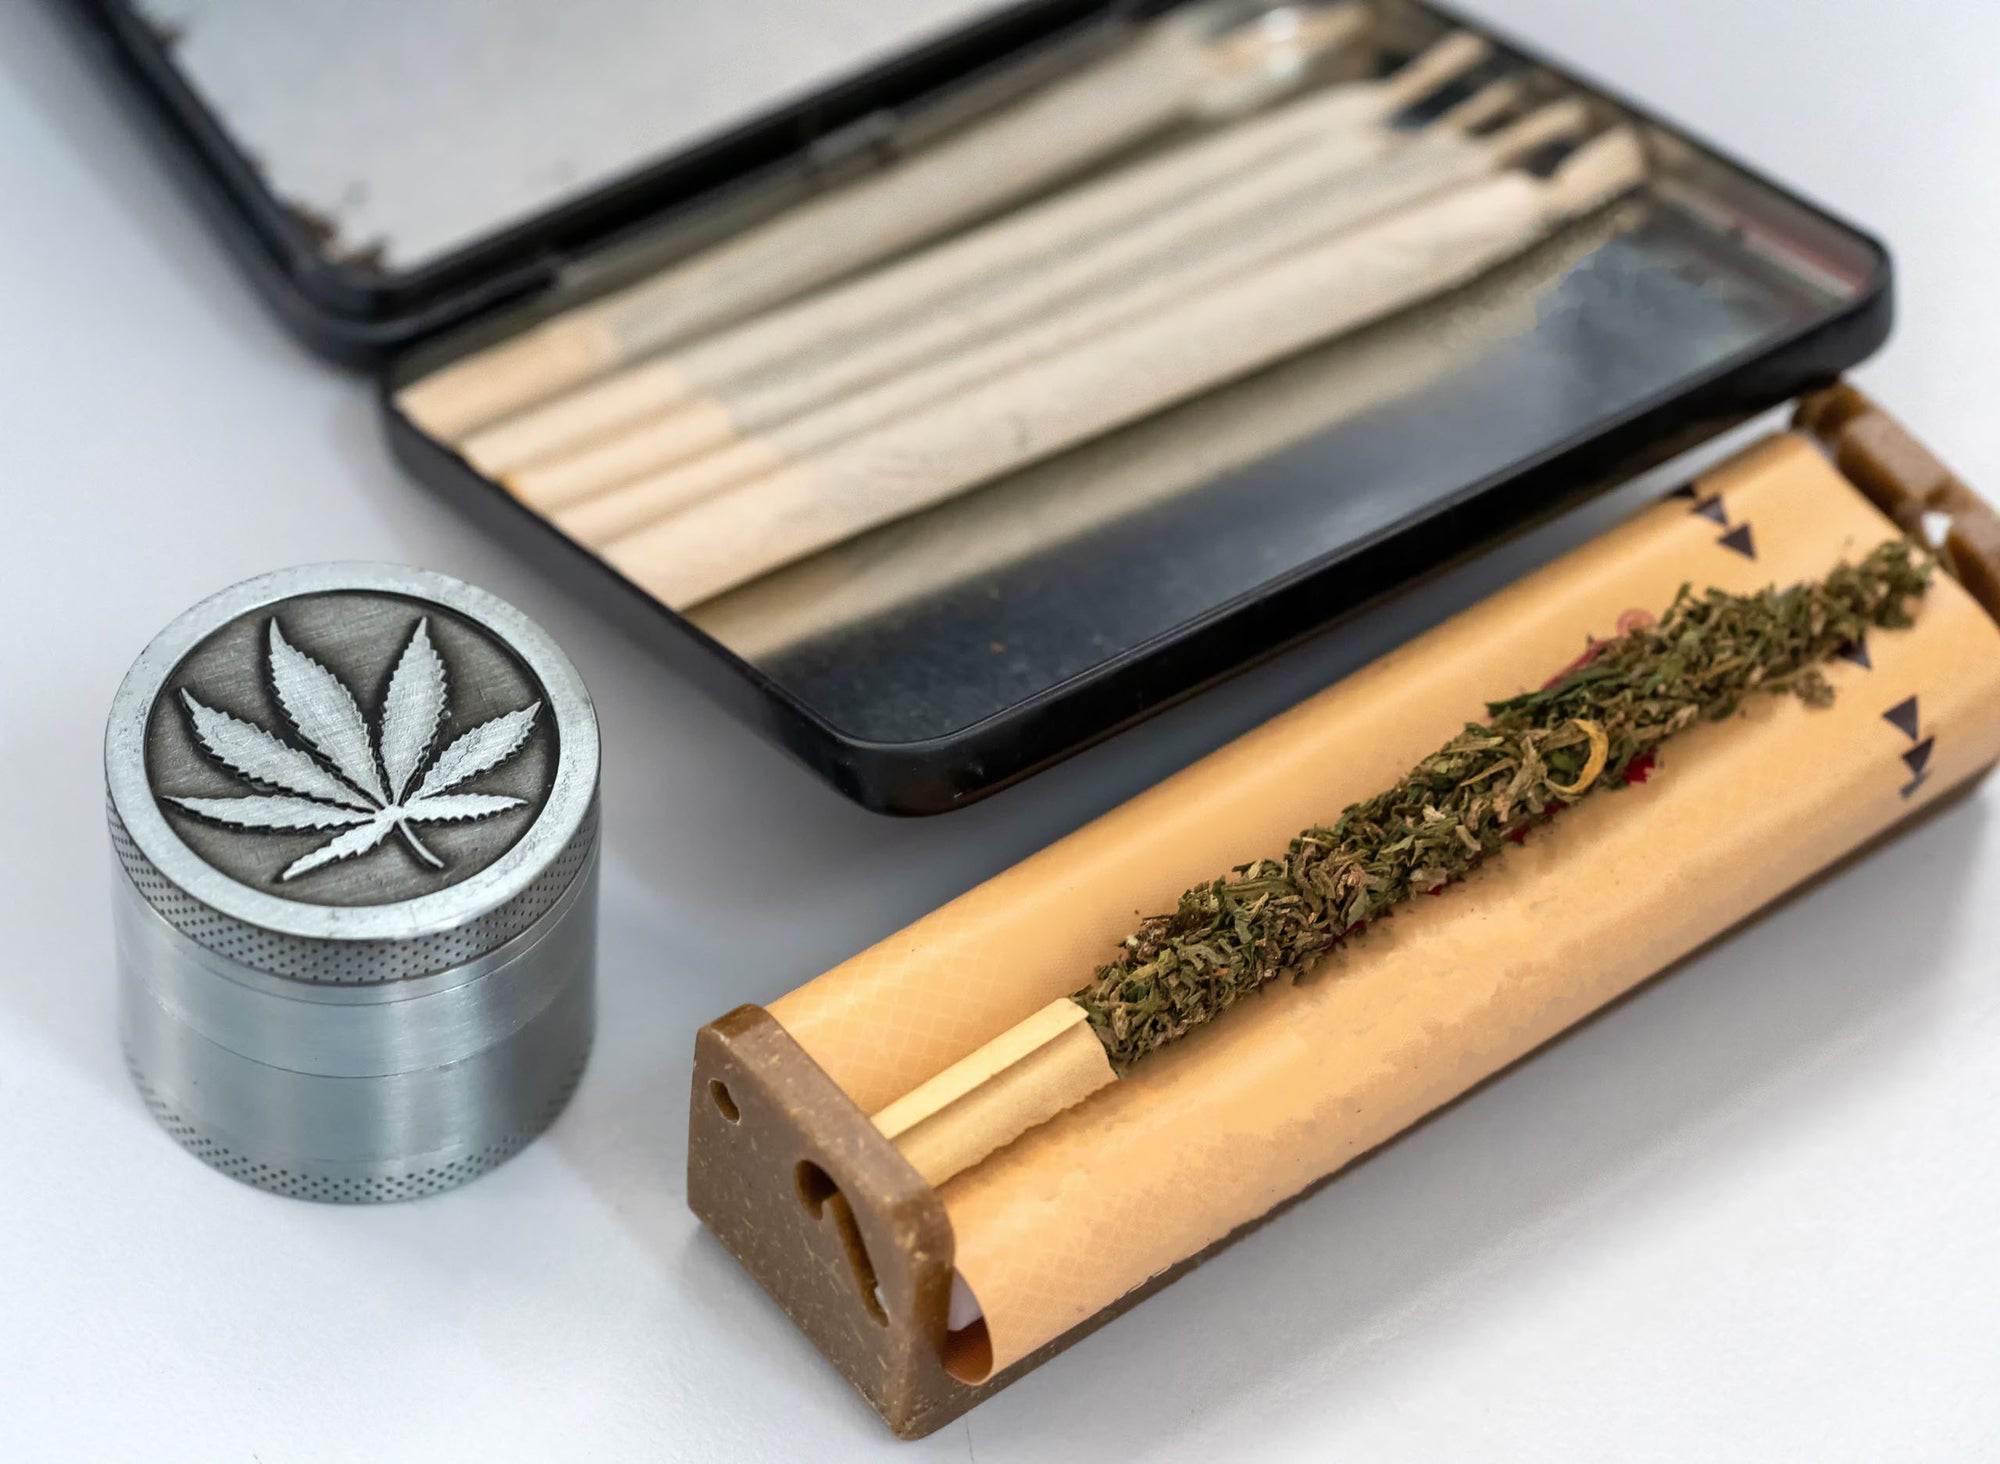
Materials Needed for Filling Pre-Rolled Cones
Preparation Steps for Perfect Cone Filling
The Proper Filling Technique for RAW Cones
Packing Methods for Even Burning
Troubleshooting Common Issues When Filling Cones
Finishing Touches for Professional-Looking Pre-Rolls
Expert Tips for Consistently Perfect Hand-Filled Cones
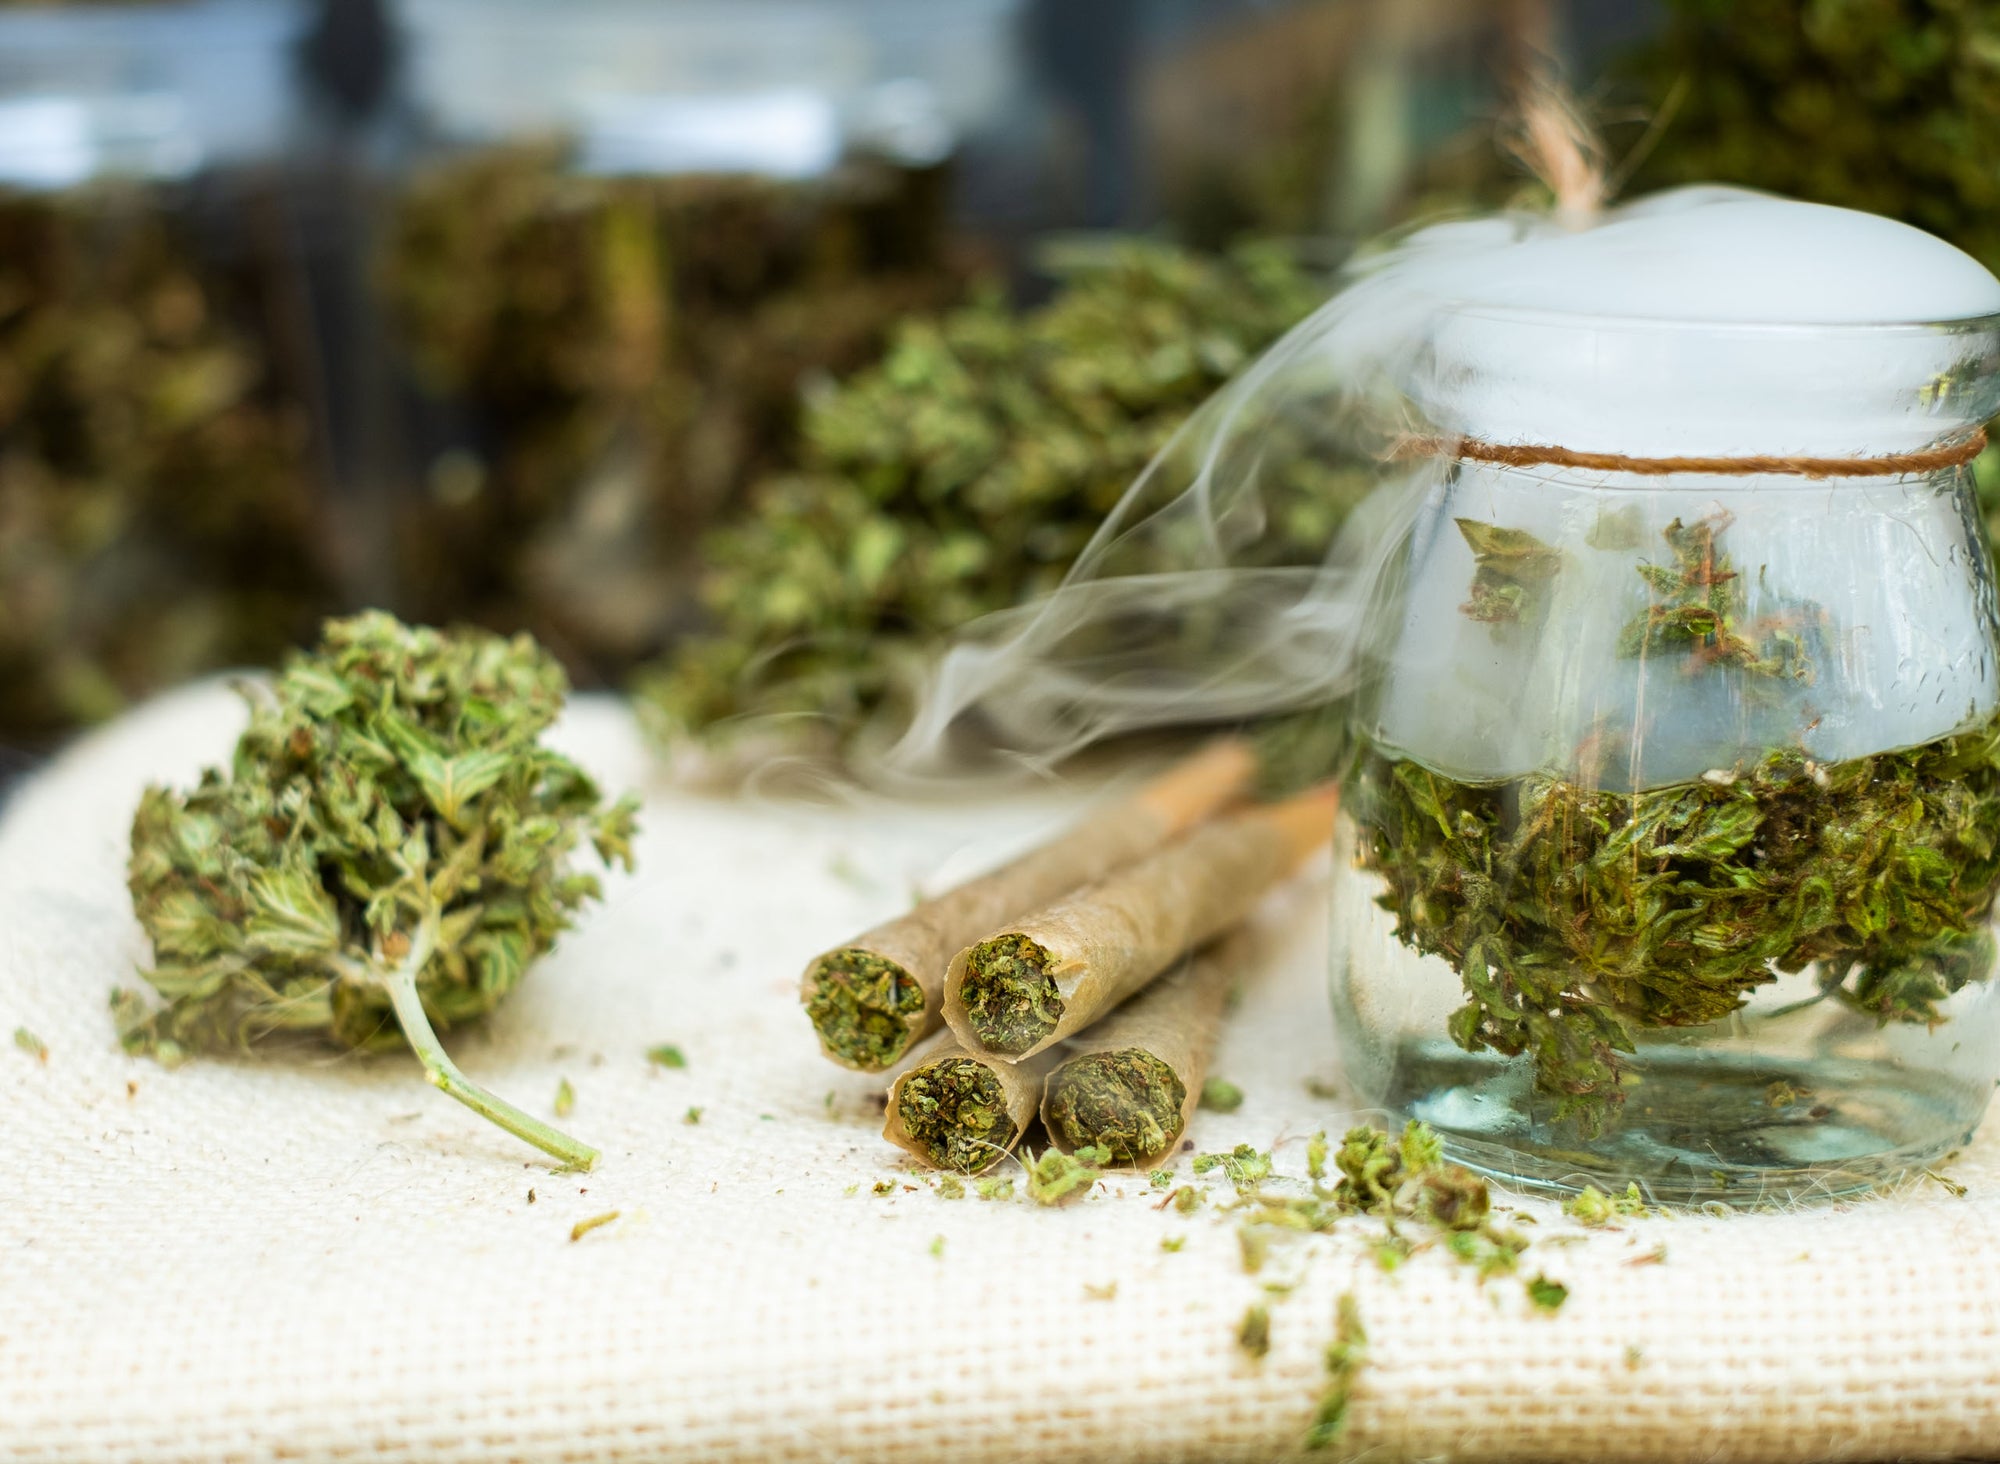
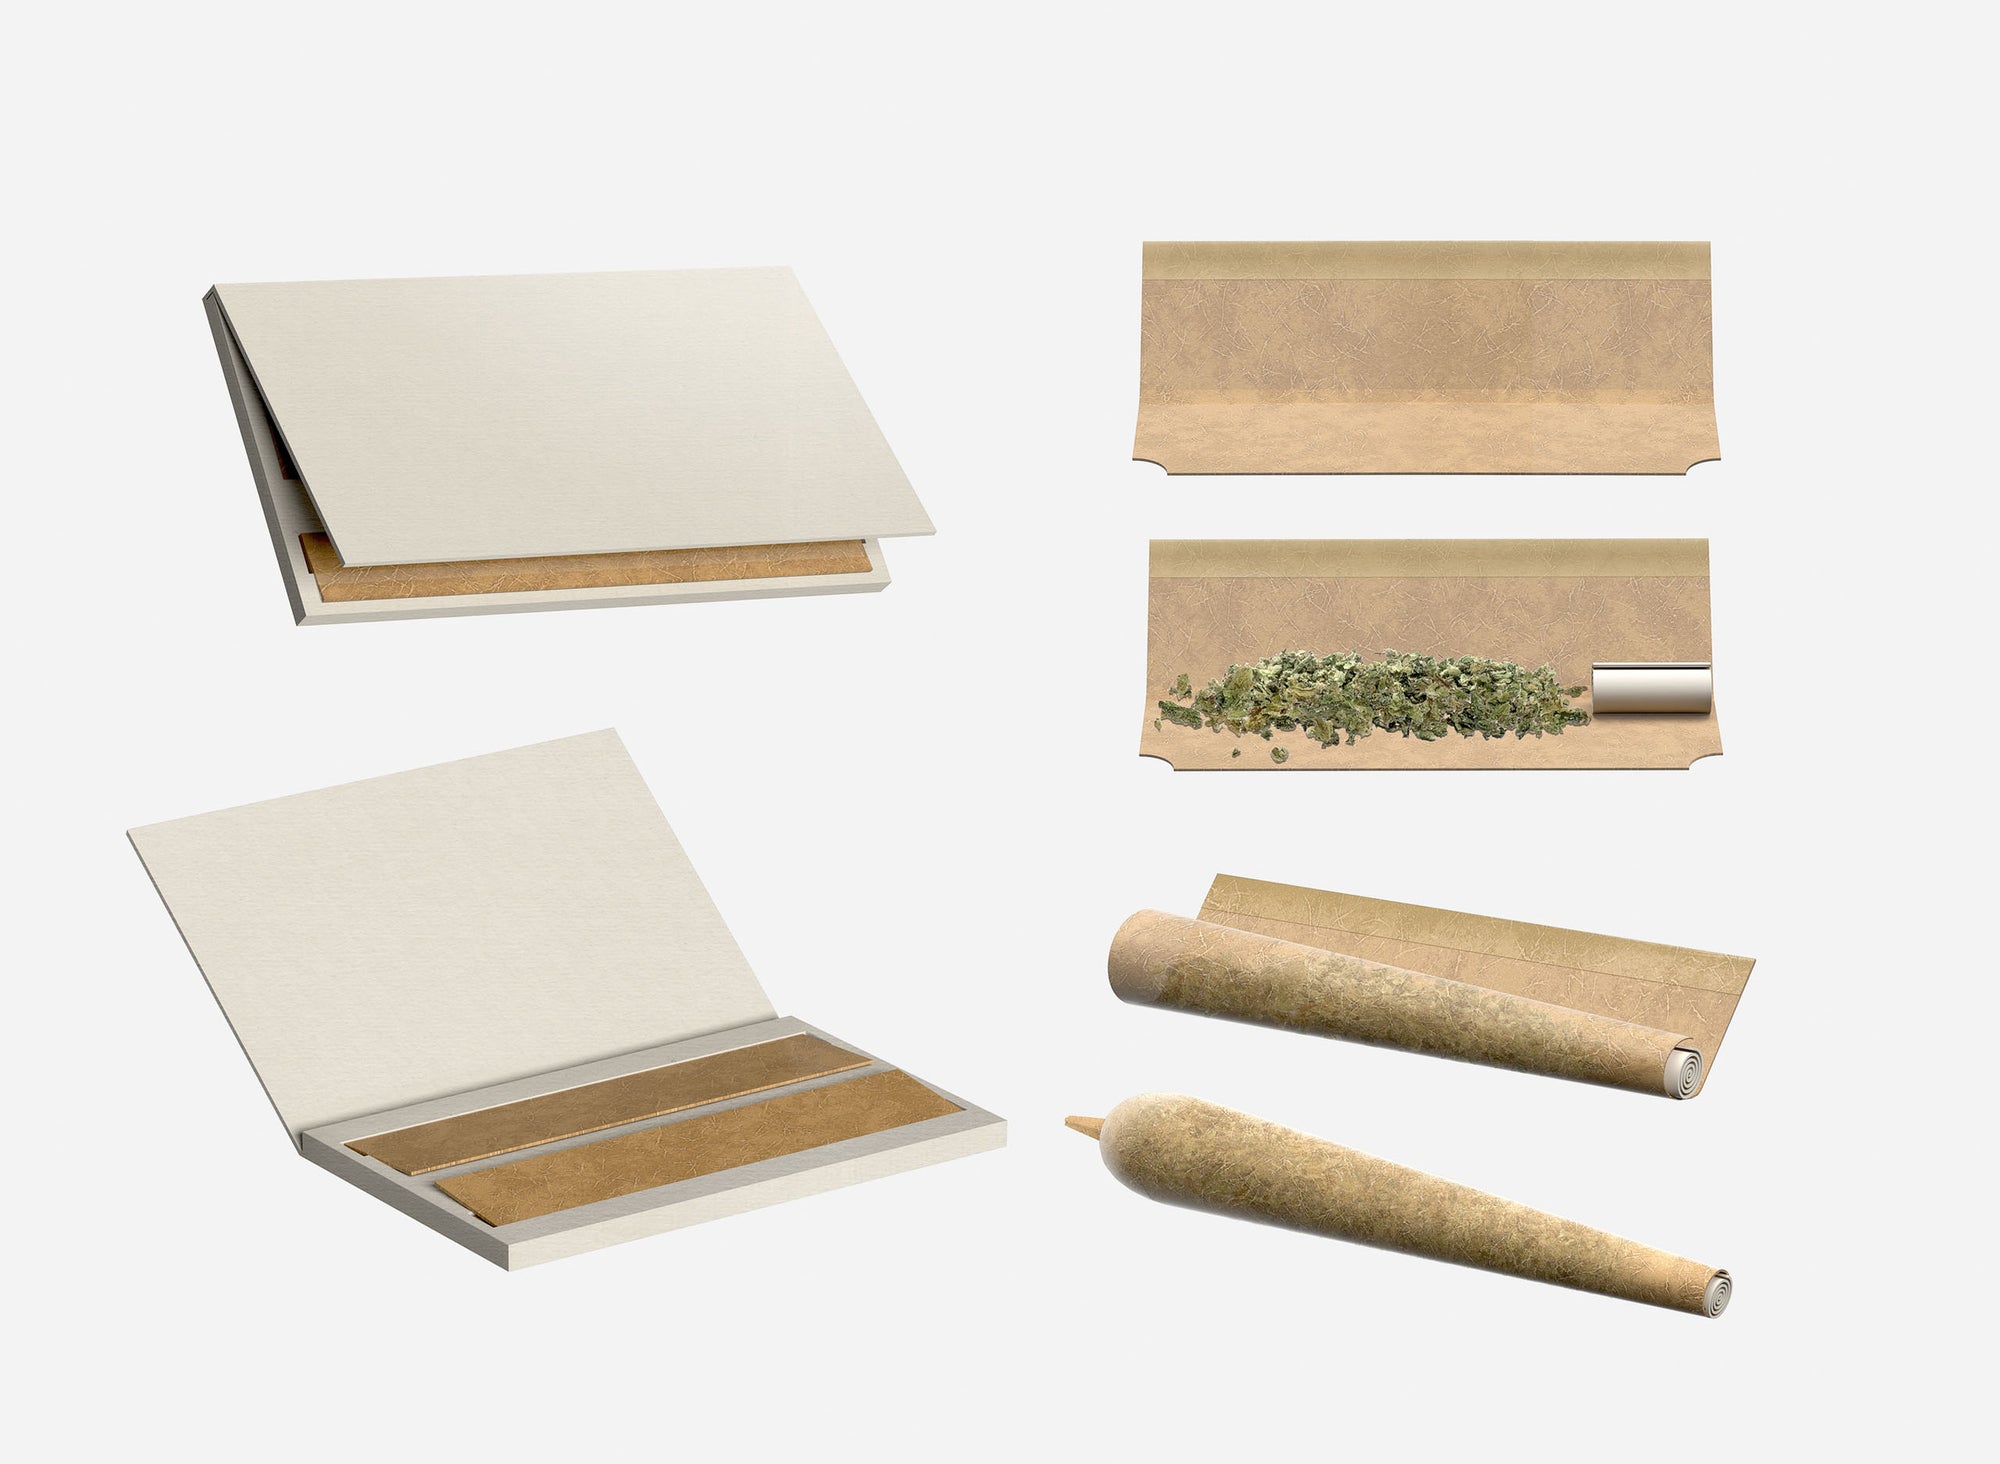
Mastering how to fill a cone pre roll by hand is an essential skill for both personal enjoyment and small-scale production. Pre-rolled cones offer convenience while still allowing for customization of your smoking experience. This comprehensive guide walks through every step of filling cones properly, ensuring even burns and satisfying sessions.Materials Needed for Filling Pre-Rolled ConesBefore learning how to fill RAW cones or any pre-rolled cone, gather these essential supplies:
Pre-rolled cones (RAW, Elements, or your preferred brand)
Ground flower material
Grinder (manual or electric)
Packing tool (often included with cone purchases)
Small funnel (optional but helpful)
Clean, flat work surface
Small container to hold ground material
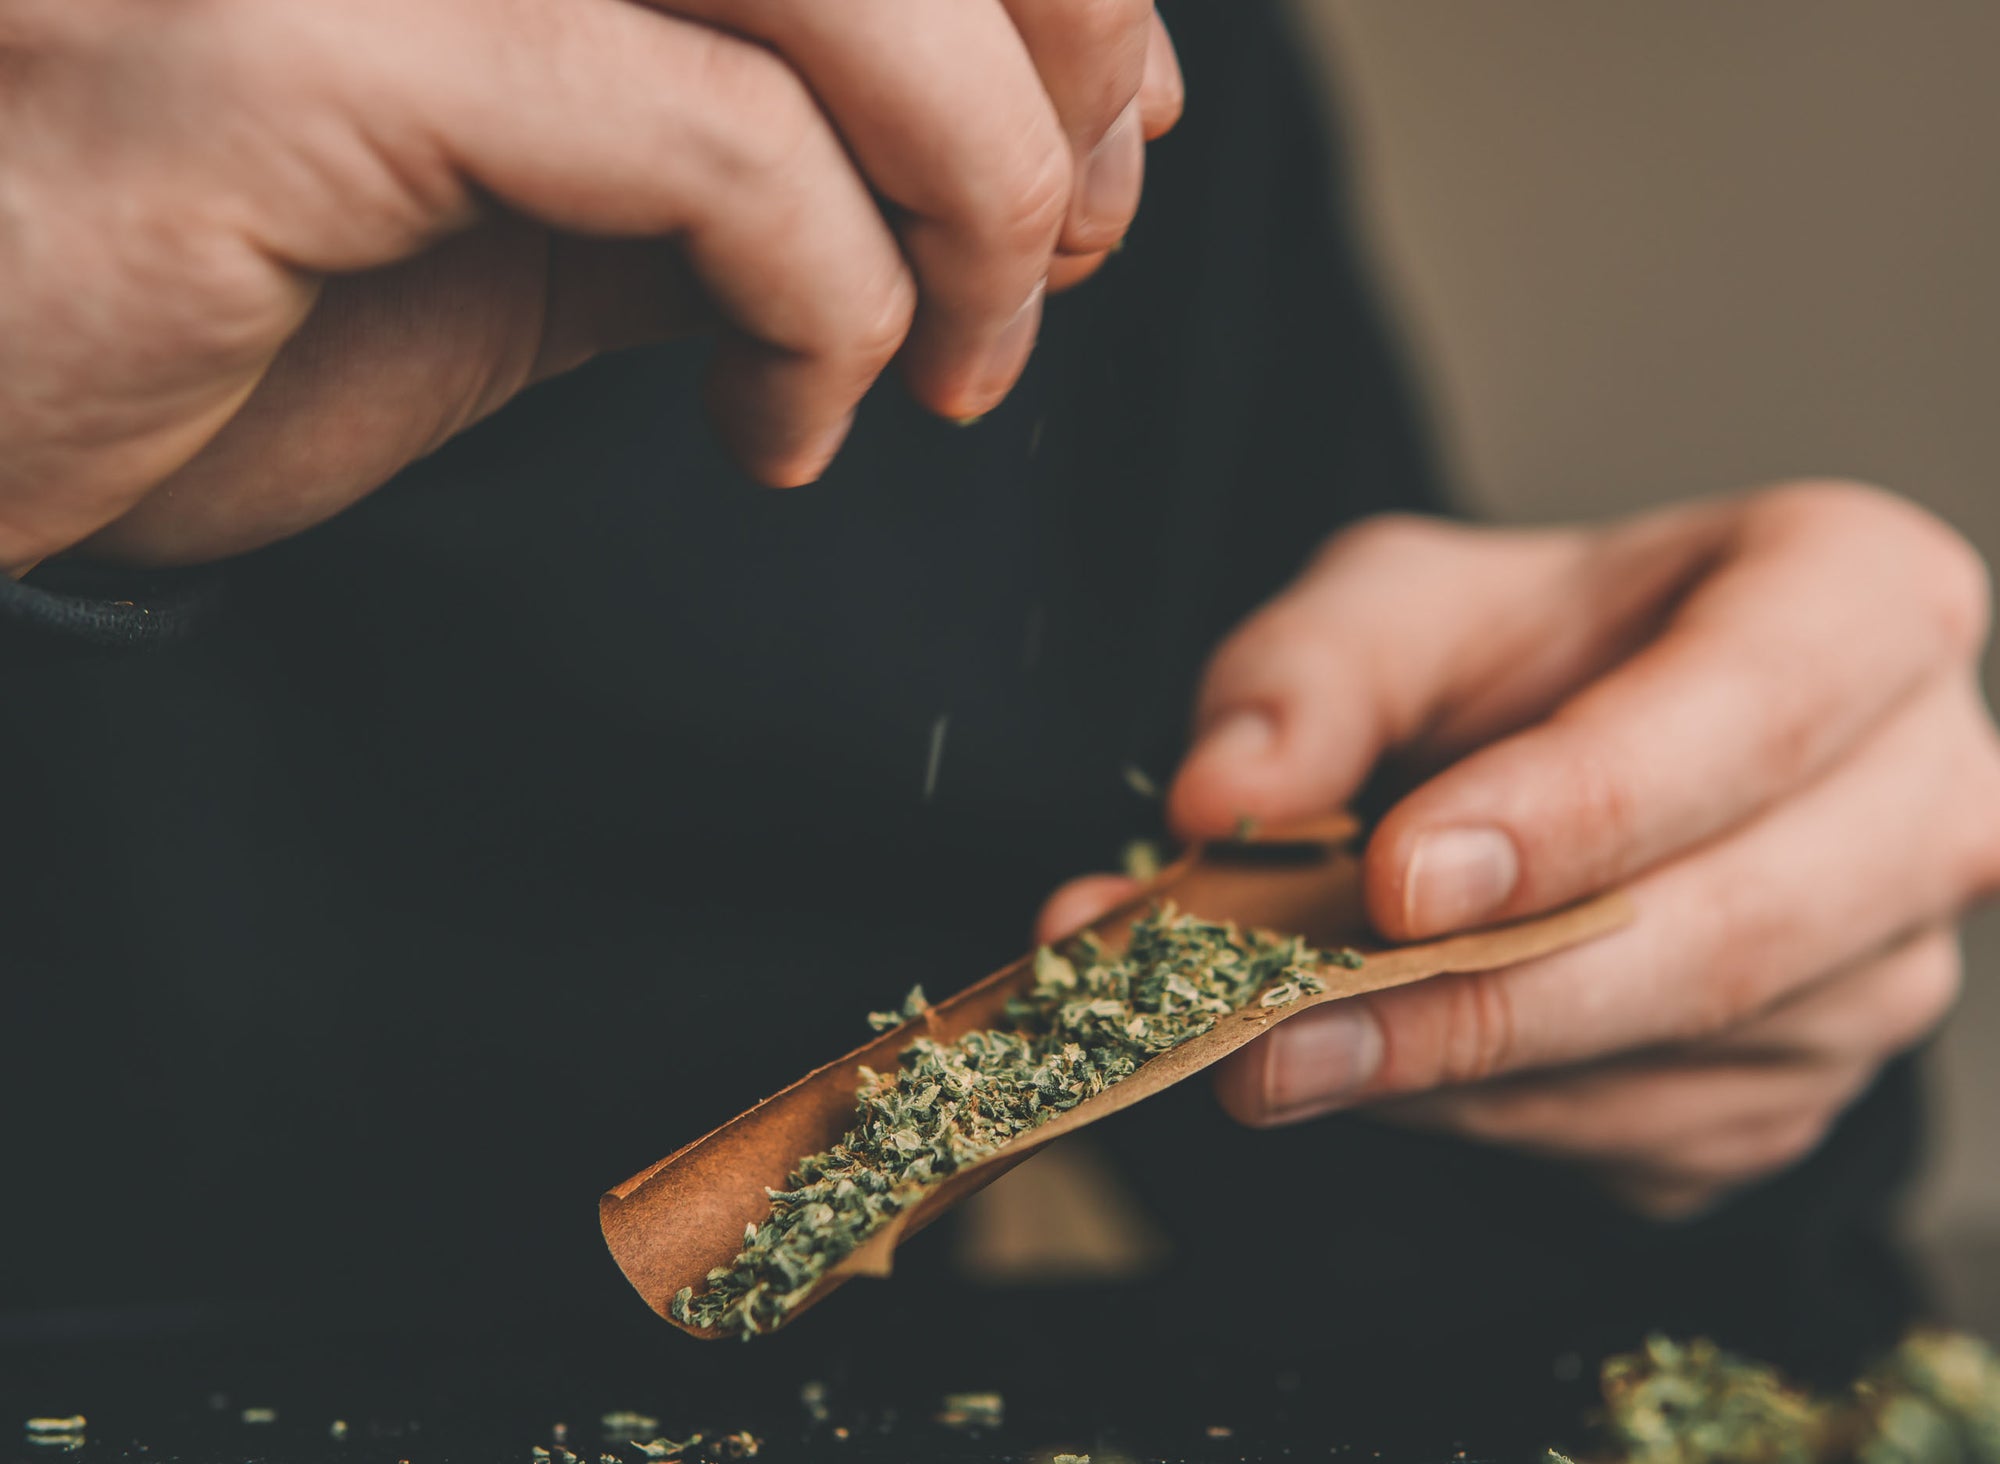
Quality grinding equipment makes a significant difference in how evenly your cones will burn. For consistent results, many producers use commercial-grade grinder machines that produce uniformly ground material, though a good hand grinder works well for personal use.Preparation Steps for Perfect Cone FillingGrinding Your MaterialThe consistency of your ground material directly impacts how well your cone burns. When learning how to fill a cone pre roll by hand, proper grinding is crucial:
Aim for a medium grind, not too fine or too coarse
Remove any stems or seeds before grinding
Grind in small batches for consistency
Allow freshly ground material to air for a few minutes (prevents moisture issues)
As detailed in this guide on mastering cone packing, proper material preparation sets the foundation for a well-burning cone.The Proper Filling Technique for RAW ConesWhen learning how to fill RAW cones or similar products, the technique matters as much as the material:Step 1: Prepare Your ConeHold your empty cone gently by the filter/crutch end with the open end facing up. Lightly tap or shake it to ensure the paper is fully expanded and ready for filling.Step 2: Create a Filling StationPlace your ground material in a small container that allows easy pinching or scooping. If using a funnel, position it in the cone's open end.Step 3: Begin the FillGradually add material to the cone, either pinching small amounts and dropping them in or using the funnel. As explained in this complete cone filling guide, patience during this step prevents uneven packing.Highlight: When learning how to fill a cone, remember that gentle, incremental filling produces better results than attempting to fill the entire cone at once.Packing Methods for Even BurningProper packing is essential when mastering how to fill cones:The Tap MethodAfter adding a small amount of material, gently tap the cone filter-end down on your work surface. This naturally settles the material without overpacking.The Tool MethodUse the packing tool that often comes with RAW cones to gently press down after adding each small portion of material. When learning how to fill a RAW cone by hand, remember to apply consistent, light pressure.The Progressive PackFor optimal burning, pack the material more loosely near the filter and progressively tighter toward the tip. This technique, recommended in this guide to understanding RAW cones, ensures smooth airflow and even burning.Troubleshooting Common Issues When Filling ConesEven experienced users encounter challenges when learning how to fill pre rolled cones:Canoeing (Uneven Burning)Caused by uneven packing. Solution: Use the packing tool to redistribute material, ensuring no air pockets remain.Too Tight (Restricted Airflow)If you've packed too tightly, gently roll the cone between your fingers to loosen the material slightly.Material SpillageFor those struggling with spillage while learning how to fill a cone, consider investing in a cone-filling station or using specialized cone filling equipment for cleaner results.Finishing Touches for Professional-Looking Pre-RollsOnce you've mastered how to fill RAW cones, these finishing steps create a polished final product:
Gently twist the excess paper at the top to seal
For immediate use, fold rather than twist for easier lighting
Lightly compress the twisted end for storage stability
For presentation, trim any excess paper with scissors
As noted in this guide to pre-rolled cones and accessories, these finishing details make the difference between amateur and professional-looking results.Expert Tips for Consistently Perfect Hand-Filled ConesAfter mastering the basics of how to fill a cone pre roll by hand, these advanced techniques will elevate your results:
Maintain consistent humidity levels for your material (62-65% is ideal)
Consider layering different varieties for custom effects
For production efficiency, prepare all your ground material before starting
Store filled cones in airtight containers to preserve freshness
Practice with different cone sizes to find your preference
Remember that filling pre-rolled cones by hand is both an art and a science. With practice and attention to detail, you'll develop your own signature technique for creating perfectly filled cones every time.
flower
Everything You Need to Know About RAW Cones: Types, Accessories, and Usage
Table of Contents
Understanding RAW Cones: Natural Rolling Papers
Types of RAW Cones: Classic, Black, and Specialty Sizes
RAW Cone Sizes: From 1 ¼ to King Size and Beyond
Packing Tools and Accessories: Making the Most of Your RAW Cones
How to Pack RAW Cones: Manual and Machine Methods
Purchasing Options: Where to Buy RAW Cones
Maximizing Your RAW Cone Experience: Tips for Enthusiasts
Everything You Need to Know About RAW Cones: Types, Accessories, and Usage
RAW cones have revolutionized the smoking experience by offering convenient, pre-rolled options that maintain the brand's commitment to natural, unrefined materials. Whether you're new to RAW products or looking to expand your knowledge, this comprehensive guide covers everything from the various types of RAW cones to the accessories that enhance their use.
Understanding RAW Cones: Natural Rolling Papers
RAW cones are pre-rolled papers made from unbleached, natural materials that are ready to fill with your preferred herbs. The classic RAW cone features the brand's signature tan color and thin texture, offering a clean smoking experience without added chemicals. Each cone comes complete with a filter tip (also called a crutch) already attached, making them ready to pack and enjoy.
What sets RAW products apart is their commitment to natural materials and sustainable practices. The papers are made from unrefined plant fibers and contain no added chalk, bleach, or dyes that might alter the flavor of your smoking material.
Types of RAW Cones: Classic, Black, and Specialty Sizes
RAW Classic Cones
The classic RAW cone is the original offering, made from unbleached natural fibers. These light tan papers are thin yet sturdy, providing a clean burn with minimal paper taste. Classic RAW cones are the most popular choice and come in various sizes to suit different preferences.
RAW Black Cones
For those seeking an even thinner paper, RAW Black cones offer an ultra-thin option. These premium papers are so thin they appear slightly translucent, providing the absolute minimum paper presence for a pure taste experience. The RAW Black line is designed for connoisseurs who want to minimize the paper's influence on flavor.
Specialty Lines
Beyond the standard offerings, RAW produces specialty cones like the Organic Hemp line and limited editions. These specialty products maintain the brand's commitment to natural materials while offering unique characteristics for different preferences.
Highlight: Whether you choose classic RAW cones or the ultra-thin Black variety, all RAW products maintain the brand's commitment to natural, unbleached materials that deliver a clean smoking experience.
RAW Cone Sizes: From 1 ¼ to King Size and Beyond
RAW cones come in multiple sizes to accommodate different needs and preferences:
1 ¼ Size: Perfect for personal use and shorter sessions
King Size: The standard larger option, ideal for sharing
98 Special RAW Cones: A unique 98mm length that offers a middle ground between standard sizes
XL RAW Cone: Extra-large options for extended sessions or larger groups
Peacemaker: The massive 2-foot long cone for special occasions
The variety of sizes available ensures there's a perfect RAW cone for every situation, whether you're enjoying a quick personal session or hosting a gathering. The RAW 98 special cone has become particularly popular for its balanced capacity that's neither too small nor too large.
Packing Tools and Accessories: Making the Most of Your RAW Cones
RAW Cone Packers and Stuffers
To achieve an even, well-packed cone, RAW offers several tools:
RAW Cone Stuffer: A simple tool to help push material down into the cone
RAW Perfect Cone Maker: Helps create evenly packed cones every time
RAW Cone Packer: A specialized tool designed specifically for tamping down material
These accessories make the filling process easier and more efficient, especially for beginners who might struggle with even packing.
Automated Solutions
For those who fill cones frequently or in larger quantities, RAW offers more advanced options:
RAW Cone Machine: Semi-automated devices that help fill multiple cones quickly
RAW Cone Shooter: Assists in filling cones with precision and speed
These tools are particularly useful for those who prepare multiple cones at once or who want consistent results with minimal effort.
How to Pack RAW Cones: Manual and Machine Methods
Properly packing a RAW cone ensures an even burn and enjoyable experience. Here's a simple process for manual packing:
Hold the cone upright, with the filter end down
Gradually add your ground material into the cone
Gently tap the cone on a flat surface to settle the material
Use a RAW cone packer or similar tool to tamp down the material
Continue adding material and tamping until filled to your preference
Twist the excess paper at the top to seal
For those seeking convenience, RAW cone filling machines offer a more streamlined approach. These devices can fill multiple cones simultaneously with consistent results, making them ideal for regular users or social gatherings.
Purchasing Options: Where to Buy RAW Cones
RAW cones are widely available through various channels:
Smoke shops and specialty stores
Online retailers and the official RAW website
Wholesale options for businesses
When purchasing, consider your needs regarding quantity and frequency of use. RAW cones come in various pack sizes, from single cones to bulk packages containing hundreds. For regular users, purchasing RAW cones in bulk from specialized suppliers can offer significant savings while ensuring you always have fresh cones on hand.
Pricing varies by size and quantity, with specialty or limited edition cones typically commanding a premium. The standard 3-pack of King Size RAW classic cones serves as a good entry point for beginners, while dedicated enthusiasts might prefer the value offered by larger packs.
Maximizing Your RAW Cone Experience: Tips for Enthusiasts
To get the most from your RAW cones, consider these practical tips:
Store unused cones in their original packaging or a sealed container to maintain freshness
Invest in a quality RAW cone holder to protect filled cones until use
For beginners, start with the classic RAW cone before exploring specialty options
Consider a RAW cone maker if you fill cones regularly
Experiment with different sizes to find your personal preference
Whether you're new to RAW products or a long-time enthusiast, understanding the full range of options helps you make informed choices that enhance your experience. From the classic RAW cone to specialized accessories like the RAW cone stuffer, each product is designed with the user's convenience and enjoyment in mind.
By exploring the various types, sizes, and accessories available, you can customize your experience to perfectly suit your preferences and needs. The versatility and natural quality of RAW cones have earned them a dedicated following among those who appreciate thoughtfully designed smoking accessories.
compliance
Understanding Prerolls: Definition, Shelf Life, and Travel Regulations
Table of Contents
What Are Prerolls: Definition and Components
Preroll Shelf Life: Do Prerolls Expire?
Traveling with Prerolls: Can You Fly with Prerolls?
Preroll Varieties and Consumption Methods
Preroll Industry Insights and Consumer Trends
Cannabis consumers seeking convenience often turn to prerolls as a ready-to-use option that eliminates the need for grinding, rolling, and preparation. As the cannabis market expands, prerolls have become increasingly popular among both newcomers and experienced users. This comprehensive guide explores what prerolls are, their shelf life, and important travel considerations.What Are Prerolls: Definition and ComponentsPrerolls, also called pre-rolled joints, are ready-made cannabis cigarettes that contain ground flower wrapped in rolling paper. These convenient products come prepared for immediate consumption, eliminating the need for consumers to handle loose flower or master rolling techniques.A standard preroll consists of three main components:
Ground cannabis flower (sometimes mixed with concentrates)
Rolling paper (typically hemp, rice, or specialty papers)
Filter tip or crutch at the mouthpiece end
Most dispensaries and brands offer prerolls in various sizes, from slim 0.5g options to larger 1g standard sizes and even multi-gram "king size" varieties. According to this guide on preroll weights, the amount of cannabis in a preroll can significantly impact potency and consumption experience.Preroll Shelf Life: Do Prerolls Expire?While prerolls don't technically "expire" in the same way food products do, they certainly degrade over time. The question "do prerolls expire?" is common among consumers concerned about maintaining product quality and potency.Factors Affecting Preroll FreshnessSeveral elements influence how long a preroll maintains optimal quality:
Storage conditions (temperature, humidity, light exposure)
Packaging quality and airtightness
Initial moisture content of the cannabis
Presence of preservatives or humidity control packets
Under ideal storage conditions, prerolls typically maintain peak freshness for 6 months to 1 year. However, even properly stored prerolls will gradually lose potency and flavor as cannabinoids and terpenes degrade through natural oxidation processes.Highlight: Properly stored prerolls can maintain quality for 6-12 months, but will gradually lose potency, flavor, and aroma over time even in optimal conditions.Signs of Degraded PrerollsYou can identify when a preroll has passed its prime by looking for these indicators:
Dry, crumbly texture that causes the preroll to burn too quickly
Musty or hay-like smell replacing the cannabis's natural aroma
Visible mold (white powdery spots or fuzzy growth)
Significantly diminished effects when consumed
For businesses looking to maintain product freshness, high-quality packaging solutions for prerolls can significantly extend shelf life by controlling humidity and preventing air exposure.Traveling with Prerolls: Can You Fly with Prerolls?The question "can you fly with prerolls?" has a complex answer that depends on several factors, including destination, departure point, and applicable laws.Domestic Travel ConsiderationsFor flights within the United States:
TSA focuses primarily on security threats, not finding cannabis
However, TSA agents are required to report cannabis discoveries to local law enforcement
Enforcement varies significantly by departure and arrival locations
Flying between two legal states still violates federal law as cannabis remains federally illegal
According to this detailed guide on flying with prerolls, the safest approach is to avoid traveling with cannabis products across state lines, regardless of the legal status in your origin and destination.International Travel RisksInternational travel with cannabis products, including prerolls, carries significant legal risks:
Many countries impose severe penalties for cannabis possession
Crossing international borders with cannabis is illegal in most jurisdictions
Even medical cannabis patients rarely have protection when traveling internationally
The consensus among legal experts is that international travel with any cannabis product should be avoided entirely due to the serious potential consequences.Preroll Varieties and Consumption MethodsThe preroll market has expanded well beyond basic joints to include numerous specialized products:
Infused prerolls containing concentrates, oils, or kief for enhanced potency
Strain-specific options targeting particular effects or flavor profiles
CBD-dominant prerolls with minimal THC for those seeking therapeutic benefits without intense psychoactive effects
Multi-packs containing smaller "mini" prerolls for microdosing
For consumers curious about what prerolls offer in terms of effects, this resource on preroll effects provides detailed information about what to expect from different varieties.Proper Consumption TechniquesGetting the most from a preroll involves proper lighting and smoking techniques:
Rotate the preroll while lighting to ensure even burning
Take slow, measured draws rather than deep inhales
Tap ash regularly to maintain even combustion
Learn proper extinguishing methods for saving partially consumed prerolls
For those looking to extend their preroll experience, these safe extinguishing methods can help preserve a partially consumed preroll for later use.Preroll Industry Insights and Consumer TrendsThe preroll segment continues to evolve as one of the fastest-growing categories in the cannabis industry. Current trends include:
Premium, artisanal prerolls using high-quality flower and specialized rolling techniques
Eco-friendly packaging solutions addressing sustainability concerns
Innovative filters designed to cool smoke and reduce harshness
Variety packs allowing consumers to sample multiple strains
For consumers interested in exploring quality options, this guide to top preroll brands highlights industry leaders known for consistency and quality.Understanding what prerolls are, their shelf life limitations, and travel regulations helps consumers make informed decisions. Whether you're new to cannabis or a seasoned enthusiast, prerolls offer a convenient consumption method with options to suit virtually any preference or need.
flower
Mastering the RAW Roller: A Step-by-Step Guide
Table of Contents
Benefits of Using RAW Rollers
Preparing Your RAW Roller
Step-by-Step Guide to Using a RAW Roller
Troubleshooting Common Issues
Advanced Techniques for RAW Roller Mastery
Essential Accessories for Your RAW Roller
RAW Roller Innovations and Future Developments
Mastering the RAW Roller: A Step-by-Step GuideLearning how to use a RAW roller effectively can transform your rolling experience, creating perfectly cylindrical rolls every time with minimal effort. Whether you're new to rolling or looking to perfect your technique, this comprehensive guide will walk you through everything you need to know about using a RAW roller.Benefits of Using RAW RollersRAW rollers have gained popularity for several compelling reasons:
Consistency in size and shape
Speed and efficiency compared to hand-rolling
Reduced material waste
Perfect for beginners or those with dexterity issues
Portable and durable design
According to our comprehensive guide to RAW rolling machines, these devices can help even complete beginners achieve professional-quality results on their first attempt.Preparing Your RAW RollerBefore learning how to use the RAW roller, it's important to understand the components:Components of a RAW RollerThe standard RAW roller consists of:
Two rolling aprons (typically made of flexible plastic)
An outer frame that holds the aprons in place
Two rollers that create the cylindrical shape
RAW rollers come in different sizes, typically 70mm, 79mm, and 110mm. The 79mm is the most popular standard size and ideal for beginners. For more information on choosing the right size, check out our guide to RAW roller sizes and options.Highlight: Proper preparation of your materials before using the RAW roller will significantly improve your results and rolling experience.Step-by-Step Guide to Using a RAW RollerFollow these steps to master how to use a RAW roller:Step 1: Position the Roller CorrectlyPlace the RAW roller on a flat surface with the RAW logo facing you. Make sure both aprons are evenly positioned and the rollers move freely when you rotate them.Step 2: Insert the Rolling PaperTake your RAW paper and place it between the two rolling aprons with the gummed edge facing up and away from you. The paper should follow the natural curve of the roller.Step 3: Add Your MaterialEvenly distribute your ground material along the length of the paper. For beginners, it's better to start with a moderate amount rather than overfilling.Step 4: Initial Rolling MotionWith your thumbs positioned on the front roller and your index fingers on the back, gently roll the aprons upward (away from you) to begin shaping your material.Step 5: Tuck and RollOnce your material is evenly distributed, roll both aprons downward (toward you) simultaneously until the paper begins to tuck into the roller. This is the critical moment that determines the tightness of your roll.Step 6: Complete the RollContinue rolling downward until only the gummed edge of the paper is visible. Lightly moisten the gummed edge with your tongue or a small amount of water.Step 7: Seal and FinishRoll completely one more time to seal the moistened edge, then continue rolling in the same direction to eject your perfectly rolled creation.For visual learners, our detailed guide to mastering RAW rolling machines includes helpful diagrams of this process.Troubleshooting Common IssuesEven with the best technique, you might encounter these common problems when learning how to use a RAW roller:Paper Crinkles or TearsThis usually happens when the paper isn't positioned properly or when the rolling motion isn't smooth. Make sure the paper is centered and apply even pressure during rolling.Uneven DistributionIf your material bunches up on one side, try distributing it more evenly before rolling. You can also gently tap the roller on a flat surface to help settle the contents.Too Tight or Too LooseThe tightness is determined during the tucking phase. For a looser roll, apply less pressure when tucking. For a tighter roll, apply more pressure and ensure the material is well-compressed before tucking.Paper Not StickingIf the gummed edge isn't adhering properly, it may not be moist enough or you might be rolling too quickly after moistening. Apply a bit more moisture and roll slowly to allow proper adhesion.Advanced Techniques for RAW Roller MasteryOnce you've mastered the basics of how to use the RAW roller, you can explore these advanced techniques:The Cone ShapeTo create a cone shape, place slightly more material at one end before rolling. This creates a tapered effect that some users prefer.Double RollingFor extra stability or special occasions, you can use two papers together in the roller. This technique requires practice but can create impressive results.Filter Tips IntegrationAdding a filter tip (also called a crutch or tip) can improve structural integrity and provide a better experience. Place the filter at one end of the paper before adding your material and rolling as normal.For more advanced techniques, our guide to automatic and manual RAW rolling techniques offers expert insights.Essential Accessories for Your RAW RollerEnhance your RAW roller experience with these accessories:
RAW filter tips for improved structure and experience
RAW hemp plastic grinder for consistent material preparation
RAW bamboo rolling tray to keep your workspace organized
RAW pre-rolled cones for times when you need a quick alternative
We also offer premium Hara Cones in our collection that provide an excellent alternative when you don't have time to use your roller but still want quality results.RAW Roller Innovations and Future DevelopmentsThe world of rolling technology continues to evolve with new innovations. RAW has expanded their roller lineup to include automatic rollers that further simplify the process. These advanced machines handle much of the manual work, making rolling even more accessible to everyone.As sustainability becomes increasingly important, RAW continues to focus on eco-friendly materials and manufacturing processes. Their commitment to natural, unrefined products extends to their rolling accessories, including the rollers themselves.Whether you're just learning how to use a RAW roller or you're looking to refine your technique, the key is practice and patience. With time, using your RAW roller will become second nature, providing you with perfectly rolled results every time.

flower
Exploring the Benefits of Glass Tips for Rolling Joints
Table of Contents
What Are Glass Tips for Joints?
Benefits of Using Glass Tips for Rolling Joints
Types of Glass Joint Tips Available
How to Use Glass Tips with Your Joints
Maintenance and Cleaning of Glass Joint Tips
Pairing Glass Tips with Other Rolling Tools
The Evolution of Joint Accessories: Where Glass Tips Fit In
The cannabis consumption experience continues to evolve with innovative accessories designed to enhance enjoyment and functionality. Among these innovations, glass tips for joints have emerged as a premium option for consumers seeking improved flavor, reduced waste, and a more sophisticated smoking experience. This comprehensive guide explores everything you need to know about joint glass tips and why they're becoming increasingly popular among cannabis enthusiasts.What Are Glass Tips for Joints?Glass joint tips are reusable mouthpieces designed to replace traditional paper filters or crutches in hand-rolled joints. Typically crafted from borosilicate or other heat-resistant glass, these accessories create a smooth channel for smoke to travel through while providing structural support to the joint itself. Unlike disposable options, glass filters for joints offer durability and can be used repeatedly with proper maintenance.Benefits of Using Glass Tips for Rolling JointsEnhanced Flavor ProfileOne of the most significant advantages of glass tips is their ability to preserve the natural flavor profile of your cannabis. Unlike paper filters that can impart subtle paper tastes, glass is a neutral material that doesn't affect the terpene profile of your flower. This allows for a purer tasting experience, especially important for connoisseurs and those using premium strains.Improved Airflow and CoolingThe design of most glass joint tips includes internal chambers or spirals that help cool the smoke before it reaches your lips. This cooling effect makes for a smoother inhale and reduces throat irritation. Additionally, these designs often improve airflow, creating an easier draw compared to tightly rolled paper filters.Sustainability FactorIn an industry increasingly focused on sustainable cannabis accessories and preservation solutions, glass tips represent an eco-friendly alternative to single-use options. A well-maintained glass tip can last for years, significantly reducing waste from discarded paper filters.Cleaner Smoking ExperienceGlass tips prevent small particles of plant material from being inhaled, commonly referred to as "Scooby snacks." They also reduce the amount of resin that makes contact with your lips and fingers, keeping your smoking experience cleaner overall.Highlight: Glass tips for joints offer a cleaner, more flavorful smoking experience while reducing waste and providing better filtration than traditional paper alternatives.Types of Glass Joint Tips Available
Standard Glass Tips: Basic cylindrical designs that serve as a simple mouthpiece
Spiral/Helix Tips: Feature internal spiral pathways that cool smoke and trap particles
Artistic Glass Tips: Decorative options featuring colors, patterns, or custom designs
Combo Tips: Multi-functional pieces that can serve as both a tip and a one-hitter
Each style offers different benefits in terms of filtration, cooling, and aesthetic appeal. When selecting joint tips glass options, consider both functionality and personal style preferences.How to Use Glass Tips with Your JointsUsing glass tips requires a slight adjustment to your rolling technique but quickly becomes second nature. Mastering joint rolling techniques with glass tips involves these basic steps:
Place your glass tip at one end of your rolling paper
Distribute ground cannabis evenly along the paper, leaving the tip exposed
Roll as you normally would, ensuring the paper wraps securely around the glass tip
Seal the joint, making sure the connection between the paper and glass is tight
For those new to rolling with glass tips, glass cone tips offer an easier starting point as they provide more stability during the rolling process.Maintenance and Cleaning of Glass Joint TipsTo maintain optimal performance and hygiene, regular cleaning of your glass tips is essential:Cleaning Methods
Isopropyl Alcohol Soak: Submerge the tip in 91% isopropyl alcohol for 30 minutes, then rinse thoroughly
Salt and Alcohol Method: Combine salt with alcohol in a small bag with your tip and shake to remove stubborn residue
Pipe Cleaners: Use to reach internal chambers and remove built-up resin
Regular maintenance ensures your glass tip continues to provide optimal airflow and remains free from harmful bacteria or mold. Most users find cleaning after every 3-5 uses maintains ideal performance.Pairing Glass Tips with Other Rolling ToolsGlass tips work exceptionally well when used alongside other quality rolling accessories. Comprehensive joint rolling guides often recommend pairing glass tips with:
Quality grinders for consistent flower texture
Rolling trays to contain material and support the rolling process
Premium rolling papers that complement the glass tip experience
Specialized rollers for joints and glass tips that simplify the process for beginners
When using rollers for joints and glass tips together, ensure the roller accommodates the diameter of your glass tip. Some manufacturers now produce rolling machines specifically designed to work with standard-sized glass tips.For those looking to elevate their experience further, incorporating concentrates with glass tips creates a premium consumption experience, as the glass helps manage the additional heat and resin produced.The Evolution of Joint Accessories: Where Glass Tips Fit InGlass tips represent part of the broader evolution in cannabis consumption accessories, moving from purely functional items to pieces that enhance both the experience and ritual of smoking. As the market continues to mature, we're seeing innovations in materials, designs, and functionality that cater to increasingly sophisticated consumer preferences.The growing popularity of glass tips aligns with broader industry trends toward premium, reusable accessories that offer both functional benefits and aesthetic appeal. For retailers and brands, offering quality glass tips provides an opportunity to enhance customer experiences while promoting sustainable consumption practices.Whether you're a casual smoker or cannabis connoisseur, exploring glass tips for joints offers a simple way to elevate your smoking experience with benefits that extend from flavor enhancement to environmental consciousness. As joint preservation techniques continue to evolve, glass tips remain at the forefront of accessories that genuinely improve the consumption experience.

flower
Understanding the Slang Term Joint and Its Meaning
Table of Contents
Joint Slang Definition and Origins
The Anatomy of a Joint: Components and Construction
Joints vs. Alternative Consumption Methods
Joint Culture and Social Significance
Regional Joint Terminology and Variations
The term "joint" represents one of the most recognizable pieces of cannabis slang in modern culture. This simple word describes a hand-rolled cigarette containing cannabis, but its cultural significance extends far beyond this basic definition. Understanding what is a joint slang requires exploring its historical context, physical characteristics, and place within broader cannabis terminology.Joint Slang Definition and OriginsIn cannabis culture, a joint refers specifically to ground cannabis flower rolled in thin paper for smoking. The term originated in the early 20th century, derived from the French word "jointure" (meaning to join or connect). By the 1940s, "joint" had become firmly established in American slang lexicons, particularly within jazz communities where cannabis use was common.The slang term gained wider recognition during the counterculture movement of the 1960s and 1970s. Today, it remains the standard terminology across most English-speaking regions, though numerous regional variations exist. As noted in comprehensive guides on joint preparation, the basic concept has remained remarkably consistent despite evolving consumption methods.The Anatomy of a Joint: Components and ConstructionUnderstanding joint slang requires familiarity with the physical construction of this cannabis format. A standard joint consists of:
Rolling paper (typically made from rice, hemp, or flax)
Ground cannabis flower
Optional filter or "crutch" (usually made from thin cardboard)
Optional adhesive (often a gummed edge on the rolling paper)
The construction process involves evenly distributing ground cannabis along the crease of the rolling paper, forming it into a cylindrical shape, and sealing it by licking the adhesive edge. Many consumers add a filter at one end to improve airflow and prevent small particles from being inhaled.For commercial operations producing pre-rolled joints at scale, specialized filling equipment enables consistent production with precise dosing and uniform packing density, eliminating the variability that often comes with hand-rolling.Highlight: The term "joint" specifically refers to cannabis rolled in paper without tobacco, distinguishing it from "spliffs" which contain both substances.Joints vs. Alternative Consumption MethodsThe joint represents just one method within a spectrum of cannabis consumption options. Understanding what makes joints distinct requires comparing them to alternatives:Joint vs. BluntWhile joints use thin paper, blunts utilize cigar wrappings or tobacco leaf papers. This distinction is explored in comparative analyses of these formats, noting that blunts typically contain more cannabis and include the effects of tobacco.Joint vs. SpliffSpliffs combine cannabis with tobacco inside rolling paper. According to resources examining these differences, this mixture creates a different experience due to the combined effects of nicotine and cannabinoids.Joint vs. BowlPipes and bowls represent reusable alternatives to joints. Comparisons between these methods highlight that joints are portable and disposable, while bowls are reusable but less discreet.Joint Culture and Social SignificanceThe joint has unique cultural significance that extends beyond its function as a consumption method. In many communities, joint rolling is considered a skill worth mastering, with techniques passed between generations. The act of sharing a joint in a circle (often called "passing" or "rotation") has become a social ritual with unspoken etiquette.Joints also feature prominently in media representations of cannabis culture, from films to music. This visibility has cemented the joint as perhaps the most immediately recognizable symbol of cannabis consumption, even as newer methods like vaporization gain popularity.The economics of joints also reveals cultural patterns. Analysis of joint pricing and consumption shows regional variations in both cost and typical size, reflecting local cannabis economies and consumption preferences.Regional Joint Terminology and Evolution of Cannabis SlangCannabis terminology varies significantly across regions and generations. While "joint" remains the standard term in American English, international variations include:
"Spliff" (Caribbean and UK, though this sometimes indicates tobacco content)
"Number" or "Jay" (parts of the UK and Australia)
"Porro" (Spain and parts of Latin America)
"Doobie" (popularized in the 1970s, still used in North America)
The language surrounding joints continues to evolve alongside cannabis culture. New terms emerge regularly, particularly in regions experiencing cannabis legalization. Understanding this terminology helps navigate both cultural conversations and product offerings in legal markets.For those interested in preservation techniques, guides on storing pre-rolled joints provide insights into maintaining freshness and potency, addressing common concerns about degradation over time.As cannabis markets mature and consumption methods diversify, the joint remains a foundational format with enduring appeal. Its simplicity, portability, and cultural significance ensure its continued relevance even as new technologies emerge. Understanding joint slang and terminology provides valuable context for both cannabis history and contemporary consumption practices.
flower
Mastering the Art of Rolling with RAW: Your Guide to Automatic and Manual Techniques
Table of Contents
Understanding RAW Rolling Essentials
Manual Rolling Techniques: Mastering the Classic Method
Automatic Rolling Machines: Efficiency and Consistency
Choosing the Right RAW Products for Your Rolling Style
Troubleshooting Common Rolling Issues
RAW Rolling Future Innovations and Community Trends
nnMastering the Art of Rolling with RAW: Your Guide to Automatic and Manual TechniquesnnPerfecting your rolling technique with RAW products can significantly enhance your smoking experience. Whether you're a novice looking to learn how to roll a RAW joint or a seasoned enthusiast interested in upgrading to an automatic joint rolling machine RAW offers, this comprehensive guide covers everything you need to know about manual and mechanical rolling methods.nnUnderstanding RAW Rolling EssentialsnnRAW has established itself as an industry leader in rolling papers and accessories, known for their unbleached, natural products that provide a pure experience. Before diving into specific techniques, it's important to familiarize yourself with the essential components of a complete RAW rolling kit:nnnRAW rolling papers (available in various sizes)nFilter tips (pre-rolled or standard)nGrinder for consistent material preparationnRolling tray to contain your materialsnOptional automatic roller for consistent resultsnnnQuality materials ensure a smoother rolling process and better final product. RAW's commitment to natural, unrefined products has made them a preferred choice for enthusiasts worldwide.nnManual Rolling Techniques: Mastering the Classic MethodnnStep-by-Step Guide to Hand RollingnnLearning how to roll a joint with RAW papers manually requires practice but offers complete control over your creation:nnnPrepare your filter tip by folding it in an accordion pattern, then roll it to create a cylindernEvenly distribute your ground material along the crease of your RAW papernPlace the filter at one endnUse your thumbs and index fingers to roll the paper back and forth, shaping your materialnTuck the unglued edge of the paper around your material and filternLick the gummed edge and roll upward to sealnTwist the open end to secure your materialnnnManual rolling allows for customization in size, density, and shape that automatic methods sometimes cannot achieve.nnHighlight: Proper material distribution is crucial for an even burn. Ensure your ground material is consistent in texture and evenly placed along the paper before rolling.nnAutomatic Rolling Machines: Efficiency and ConsistencynnFor those seeking consistency or struggling with manual techniques, a joint rolling machine RAW produces can be an excellent solution.nnTypes of RAW Rolling MachinesnnRAW offers several types of rolling machines to suit different preferences:nnnStandard roller (70mm and 79mm) for regular jointsnKing size roller (110mm) for larger formatsn
RAW blunt rolling machine for thicker rollsnAutomatic box rollers with built-in storagennnUsing an Automatic RAW RollernnThe process of using a RAW rolling machine is straightforward:nnnOpen the roller by separating the two rollersnInsert a RAW paper between the rollers with the gummed edge facing up and away from younPlace your filter at one endnAdd your ground material evenly across the papernClose the roller and rotate both rollers forward to form your jointnInsert the gummed edge and continue rolling to sealnnnAutomatic rollers provide consistency that's particularly valuable for medical users who need precise, repeatable results. According to safety guidelines for medicinal products, consistent dosing and proper packaging are important considerations, especially for products that require child-resistant features.nnChoosing the Right RAW Products for Your Rolling StylennRAW offers an extensive range of products to enhance your rolling experience:nnPapers and ConesnnChoose from various options including:nnnRAW Classic (natural brown)nRAW Black (ultra-thin premium)nRAW Organic Hempn
Pre-rolled RAW cones for those who prefer to skip rolling entirelynnnAccessories That Enhance Your Rolling ExperiencennComplete your kit with:nnnRAW rolling trays in various sizesnRAW grinders for consistent material preparationnStorage containers to maintain freshnessn
RAW filter tips (standard or pre-rolled)nnnTroubleshooting Common Rolling IssuesnnEven with the right tools, challenges can arise. Here are solutions to common problems:nnManual Rolling Challengesnnn
Uneven burning: Ensure even material distribution and proper rolling tensionn
Paper tearing: Handle papers with dry fingers and avoid excessive moisturen
Loose rolls: Practice the tucking technique and maintain even pressurennnAutomatic Roller Issuesnnn
Paper jamming: Insert the paper correctly and avoid overfillingn
Inconsistent results: Distribute material evenly and rotate rollers at a steady pacen
Filter slipping: Secure the filter properly before beginning the rolling processnnnRAW Rolling Future Innovations and Community TrendsnnThe art of rolling continues to evolve with new products and techniques emerging regularly. RAW's commitment to innovation means we can expect continued improvements in both manual and automatic rolling solutions. The community around RAW products continues to grow, with enthusiasts sharing techniques and tips online.nnWhether you prefer the traditional approach of hand-rolling or the consistency of an automatic joint rolling machine RAW provides, mastering these techniques allows you to create the perfect roll for your preferences. With practice and the right tools, anyone can achieve professional-quality results that enhance the overall experience.nnRemember that the journey to mastering rolling techniques is personal, and what works best will depend on your specific preferences and needs. Experiment with different papers, machines, and methods to find your ideal approach to the art of rolling with RAW products.

compliance
Traveling with Pre-Rolls: Guidelines for Checked Baggage on Domestic and International Flights
Table of Contents
Legal Considerations for Traveling with Pre-Rolls
Domestic Flight Policies: TSA and Airline Guidelines
United Airlines Policies on Cannabis Products
International Travel Risks and Considerations
Storage Solutions for Discreet and Compliant Travel
Practical Travel Alternatives for Cannabis Users
As cannabis legalization expands across states, travelers increasingly wonder if they can bring pre-rolls in a checked bag when flying. The answer involves understanding federal regulations, airline policies, and international laws that govern cannabis transportation. This guide examines the legalities and risks associated with traveling with pre-rolls on domestic and international flights.Legal Considerations for Traveling with Pre-RollsDespite state-level legalization, cannabis remains a Schedule I controlled substance under federal law. This classification creates significant complications for air travelers, as airports and aircraft fall under federal jurisdiction. Even in states with legal recreational cannabis, federal law supersedes state regulations once you enter airport property.According to our guide on bringing pre-rolls on planes, the Transportation Security Administration (TSA) does not specifically search for cannabis products, but they are required to report discoveries to law enforcement. This creates a legal gray area that puts travelers at risk regardless of their departure or arrival state's cannabis laws.Domestic Flight Policies: TSA and Airline GuidelinesThe TSA's primary mission is detecting threats to aviation security, not enforcing drug laws. However, their official position states: "Marijuana and certain cannabis infused products, including some Cannabidiol (CBD) oil, remain illegal under federal law except for products that contain no more than 0.3 percent THC on a dry weight basis or that are approved by FDA."When TSA agents discover cannabis products during screening:
They are required to notify airport law enforcement
Local authorities determine how to proceed based on departure state laws
Quantity plays a significant role in how the situation is handled
Medical cannabis cards may provide some protection in medical-only states
For more detailed information on TSA interactions, our resource on bringing pre-rolls through TSA provides comprehensive guidance.Highlight: Under federal law, transporting cannabis across state lines constitutes interstate drug trafficking, regardless of the legal status in departure and arrival states.United Airlines Policies on Cannabis ProductsFor those specifically wondering "can you bring pre-rolls in a checked bag United," it's important to understand United Airlines' stance. Like all major U.S. carriers, United Airlines adheres to federal regulations regarding controlled substances. Their policy prohibits the transportation of cannabis products, including pre-rolls, regardless of whether they're carried in checked or carry-on luggage.United's contract of carriage specifies that they may refuse transportation of items that violate federal laws. Cannabis products clearly fall into this category, making their transportation on United flights a violation of both airline policy and federal law.International Travel Risks and ConsiderationsThe question "can you bring pre-rolls in a checked bag international" comes with even greater risks. International cannabis transportation introduces additional layers of legal complexity and significantly harsher penalties.Key considerations for international travel include:
Most countries maintain strict anti-cannabis laws with severe penalties
Even countries with legal cannabis (Canada, parts of Europe) prohibit international importation
Cannabis possession can result in lengthy prison sentences in many countries
U.S. consular protection is limited for citizens arrested on drug charges abroad
For travelers who need to store cannabis products securely at home while traveling, high-quality storage containers like mylar bags provide an airtight, odor-proof solution that helps maintain product freshness until your return.Storage Solutions for Discreet and Compliant TravelWhile we don't recommend traveling with pre-rolls, understanding proper storage is important for both legal compliance and product preservation. For those traveling within legal states by car or other ground transportation, proper storage helps maintain compliance with open container laws and preserves product quality.Effective storage options include:
Child-resistant containers that meet state compliance requirements
Odor-proof cases that prevent detection
Original dispensary packaging with required warning labels
Humidity-controlled containers for longer trips
Understanding pre-roll safety considerations is essential regardless of your travel plans, as proper storage prevents degradation and maintains potency.Practical Travel Alternatives for Cannabis UsersRather than risking legal complications by attempting to transport pre-rolls across state or international boundaries, consider these practical alternatives:
Research legal purchasing options at your destination using resources like our guide to finding pre-rolls near you
Explore legal CBD options with less than 0.3% THC that comply with federal regulations
Consider a tolerance break during travel
Investigate local laws thoroughly, as illustrated in our guides for specific regions like Georgia and Ohio
The safest approach is to research the laws at your destination and make purchases locally where legal, rather than transporting products across jurisdictional boundaries. This eliminates the risk of serious legal consequences while still allowing you to enjoy cannabis products where permitted by law.
flower
Everything You Need to Know About RAW Rolling Papers
Table of Contents
The History and Philosophy Behind RAW Papers
Types of RAW Rolling Papers
Materials and Composition of RAW Sheets
Spotting Authentic RAW Products
Essential Rolling Techniques for RAW Papers
Accessories and Tools to Enhance Your Rolling Experience
RAW's Sustainability Practices and Environmental Impact
Future Innovations in the RAW Product Ecosystem
nnEverything You Need to Know About RAW Rolling PapersnnRAW rolling papers have revolutionized the rolling experience with their natural approach, distinctive appearance, and commitment to quality. Whether you're new to rolling or a seasoned enthusiast looking to expand your knowledge, understanding the nuances of RAW sheets can significantly enhance your rolling experience. This comprehensive guide covers everything from the brand's origins to rolling techniques and accessories.nnThe History and Philosophy Behind RAW PapersnnFounded by Josh Kesselman, RAW emerged from a vision to create the purest, most natural rolling papers possible. The brand's philosophy centers around unrefined, unbleached papers that maintain the integrity of what's being rolled. Since its inception, RAW has grown from a niche product to a globally recognized brand with a loyal following.nnRAW's commitment to purity isn't just marketing; it's embedded in every aspect of their production process. Their dedication to creating papers free from chalk, burn additives, and other chemicals has set a new standard in the industry.nnTypes of RAW Rolling PapersnnClassic vs. Organic Hemp vs. Black SeriesnnRAW offers several distinctive lines of rolling papers, each with unique characteristics:nnn
RAW Classic: Made from unrefined, natural brown rice paper, these are the original RAW sheets that started it all.n
RAW Organic Hemp: Created from organically grown hemp plants, offering a slightly thicker texture and slower burn.n
RAW Black: The ultra-thin premium line, designed for connoisseurs who prefer minimal paper interference.nnnAs detailed in this comprehensive guide to RAW paper types, each variety offers different burning characteristics and rolling experiences.nnSize VariationsnnRAW papers come in multiple sizes to accommodate different preferences:nnnSingle Wide (70mm x 37mm)n1 ¼ (79mm x 44mm)n1 ½ (79mm x 60mm)nKing Size (110mm x 53mm)nKing Size Slim (110mm x 45mm)nnnHighlight: RAW sheets are available in various thicknesses and materials, allowing users to customize their rolling experience based on personal preference and occasion.nnMaterials and Composition of RAW SheetsnnRAW papers stand out for their minimalist approach to materials. The papers are crafted from unrefined plant fibers, primarily rice and hemp, depending on the specific line. What's notably absent are the additives commonly found in conventional rolling papers: no chalk, no added burn agents, and no artificial coloring.nnThis natural composition contributes to RAW's signature light tan color and the distinctive watermark pattern visible when held to light. For those concerned about what they're consuming, this detailed breakdown of RAW paper composition provides reassurance about their safety profile.nnSpotting Authentic RAW ProductsnnWith RAW's popularity has come an unfortunate rise in counterfeit products. Authentic RAW papers have several distinguishing features:nnnCriss-cross watermark that becomes visible when held to lightnNaturally uneven edges (not perfectly straight cuts)nMicrotext on packaging that reads "RAW" repeatedlynQR code verification on newer packagingnnnThe packaging itself offers clues to authenticity, with distinctive RAW wrappers and packaging elements that counterfeiters often fail to replicate accurately.nnEssential Rolling Techniques for RAW PapersnnRolling with RAW papers requires slightly different techniques than with conventional papers. Their natural composition means they have less grip than chemically treated papers, which can be challenging for beginners.nnFor optimal results:nnnStart with the gum strip facing up and away from younDistribute material evenly along the creasenUse a gentle touch when tucking the papernLick the gum strip lightly, as over-wetting can compromise the adhesivennnMany enthusiasts find that using quality rolling trays from our collection significantly improves their rolling process by providing a clean, flat surface that prevents material loss and helps with organization.nnAccessories and Tools to Enhance Your Rolling ExperiencennRAW has developed an extensive ecosystem of accessories designed to complement their papers:nnn
RAW Tips/Filters: Available in various sizes and materials, including the premium Glass Tipsn
RAW Rollers: Mechanical devices that simplify the rolling processn
RAW Pre-rolled Cones: Ready-to-fill cones for those who struggle with hand-rollingnnnFor those who prefer the convenience of pre-rolled options, our selection of RAW cones offers the same quality experience without the rolling learning curve.nnRAW's Sustainability Practices and Environmental ImpactnnBeyond creating natural products, RAW has established the RAW Foundation, which supports various environmental and social causes. Their commitment to sustainability extends to their sourcing practices, with hemp and rice papers sourced from regions known for sustainable agriculture.nnThe company has also pioneered biodegradable packaging solutions and continues to reduce plastic in their product line. This environmental consciousness has helped cement RAW's reputation as not just a product but a lifestyle brand with values that resonate with conscious consumers.nnFuture Innovations in the RAW Product EcosystemnnRAW continues to evolve its product offerings based on community feedback and technological advancements. Recent innovations include improved gum strips for better adhesion, specialized papers for specific rolling preferences, and expanded accessory lines that complement the core paper products.nnAs the market for rolling papers grows and diversifies, RAW remains at the forefront by balancing traditional craftsmanship with modern innovations. Their commitment to natural materials while improving functionality ensures that RAW sheets will continue to be a top choice for discerning rollers worldwide.nnWhether you're just starting your rolling journey or looking to refine your technique with premium papers, this guide on purchasing authentic RAW papers can help ensure you're getting the genuine experience that has made RAW a household name in rolling culture.